
7 Necessary Steps for a Tensile Strength Test
Getting from a lab concept to a commercial product is not always smooth sailing. Once materials face stresses like heat and vibration, they might fail in ways you weren’t expecting. This problem stems from a lack of clarity on the material’s real-world application and technical limitations.

The tensile strength test is a standard and dependable testing methodology that helps to overcome this uncertainty. The results of this test support materials decision-making across R&D, quality control, and production, and its subsequent data is a key competitive advantage. This is reflected by the increasing investment in the advanced tensile testing market, which is expected to reach $263.8 million in 2025.
Getting accurate and reliable tensile strength test data requires total consistency from setup to recording. Following a repeatable seven-step testing workflow ensures all generated tensile results remain actionable and ready to use. Here’s what you need to know about tensile strength tests and how to perform them effectively.
What is tensile testing?
To understand the tensile strength test, it is essential to first comprehend the field of tensile testing, a materials science and engineering testing process that determines how a material behaves when it is deformed under an applied load. These tests involve subjecting a sample to a controlled axial force (tension) until it fractures (fails).
Tensile testing, also called a tension test or pull test, is categorized as a quasi-static uniaxial tensile test. This terminology simply means that a controlled, consistent force is applied along a single axis (uniaxial) at a relatively slow, constant rate (quasi-static) until the test specimen (the material) fractures.
These fundamental tests help predict how a material will perform under force in its final application, which could ultimately prevent catastrophic product failure and compliance violations. For these reasons, regulatory, QC/QA, materials science, and R&D teams all utilise data from tensile tests to inform their materials decisions and support formulation optimization.
Tensile Testing Types
There are several common methodologies for tensile testing:
- Standard uniaxial test: The go-to test is conducted at ambient temperature to determine baseline properties, including tensile strength and stiffness.
- Microtensile assessment: Used for tiny or fragile samples, such as thin films, that require specialized, high-precision equipment to prevent damage.
- High-temperature tensile test: Performed inside an environmental chamber to see how a material’s properties change when things get hot.
- Specialized test: Customized setups for highly flexible materials like elastomers or textiles. The fixtures will be specially tuned so the samples don’t slip.
Tensile Testing Outputs
Tensile testing uses a Universal Testing Machine (UTM). It grips the material at both ends and pulls until it yields or breaks. As the UTM’s crosshead moves, the machine records raw data such as:
- Load (force): Measured by a load cell, which is a force sensor. It is basically a highly accurate scale that measures how hard the machine is pulling.
- Elongation (displacement): The change in length of the specimen under load, measured directly over the gauge length using an extensometer for accurate strain reporting, or obtained from crosshead displacement when only system movement is recorded.
Once you’ve gathered this raw data, you can mathematically convert it into valuable metrics, which is the useful info your engineers actually care about, such as:
- Stress = Force divided by the original cross-sectional area.
- Strain = Change in length divided by the original length.
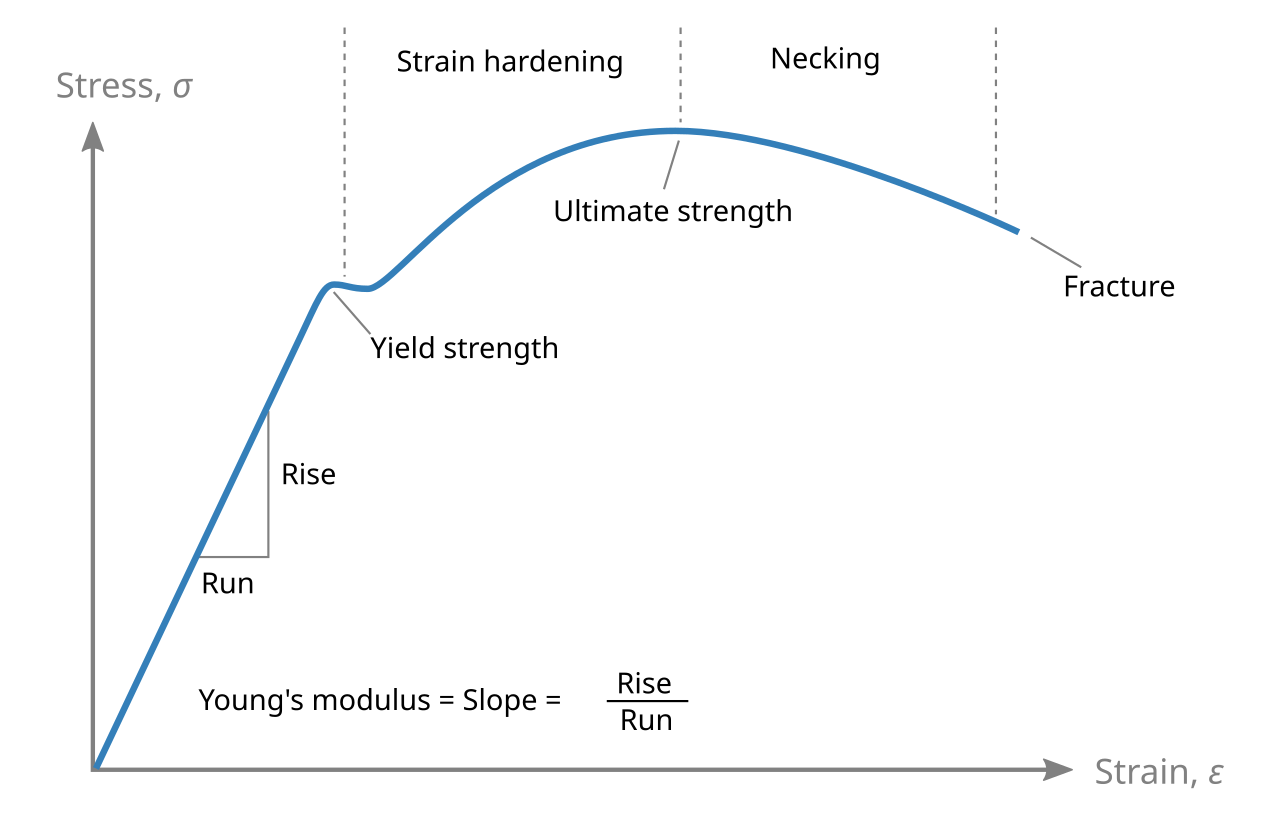
When you plot stress and strain together, you get a stress–strain curve, which describes how a material responds to applied load across elastic and plastic deformation. In practice, tensile testing is often used alongside other mechanical characterization methods, such as Dynamic Mechanical Analysis (DMA), to build a more complete understanding of material behavior.
What is a tensile strength test?
While broader tensile testing measures a material’s full stress-strain behavior, a tensile strength test specifically measures the maximum stress that the material can withstand before failure.
It applies to nearly every material, giving engineers and QA teams a clear and quantifiable measure of ultimate load-bearing capability. The tensile strength test uses a UTM, load cell, appropriate grips or fixtures, and an extensometer to measure core mechanical properties, including:
- Ultimate Tensile Strength (UTS): Peak load (maximum force) sustained by the specimen (the material) divided by its original cross-sectional area. The UTS is the highest point on the stress-strain curve and is extremely important for structural design.
- Yield strength: Stress level at which the material shifts from elastic (temporary) to plastic (permanent).
- Elongation at break: Percentage by which the material stretched before fracturing (a measure of ductility).
- Nature of the fracture: Data analysis to identify the failure mode, such as brittle cleavage.
You can use this data to understand whether a material is suitable for its intended application, ensuring the final product will not deform or break under its operational load. For example, in applications such as water and irrigation piping, this validation helps ensure pipe materials can withstand service loads and installation stresses that might otherwise contribute to issues like irrigation leaks over time. A tensile strength test is subject to industry standards, such as ASTM E8 (for metals), ASTM D638 (for plastics), or ISO 527.
Benefits of Tensile Strength Testing
The mechanical data generated by a tensile strength test provides many benefits, including the intelligence for:
- Performance verification and material selection: Engineers use UTS, yield strength, and elasticity data to select materials that meet defined mechanical requirements and design loads at the outset of development to establish confidence in baseline performance before scaling or validation.
- QA and regulatory compliance: Auditable data is essential for regulatory filing and certification requirements, especially in high-stakes industries like aerospace and medical devices.
- Batch consistency: Routinely performing tensile strength tests means QC teams can monitor the variance in mechanical properties across different production batches or processing conditions.
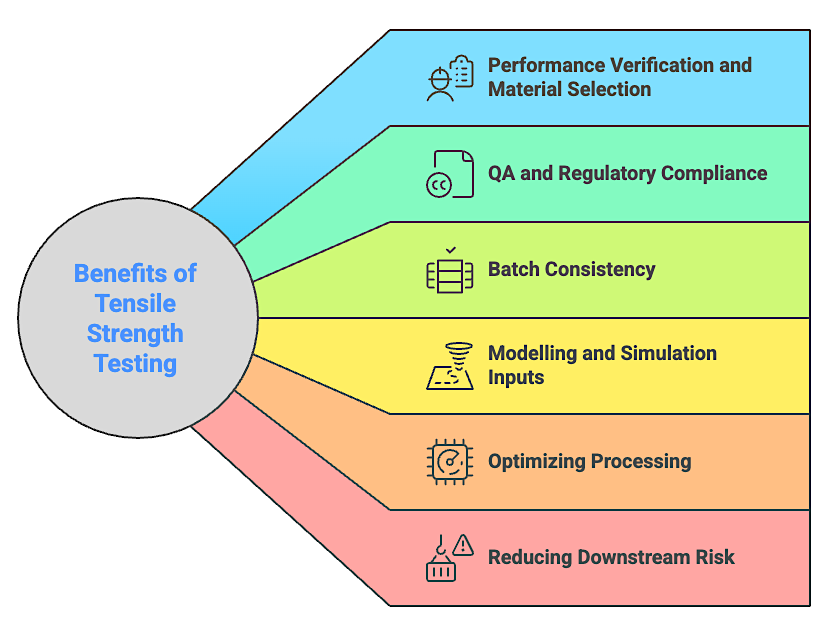
- Modelling and simulation inputs: Data from the tensile test is essential for creating reliable simulations that predict fatigue life and stress distribution without requiring exhaustive physical prototyping.
- Optimizing processing: For R&D teams, the test helps link a material’s microstructure or chemical composition to its physical performance, which supports optimizing formulation and manufacturing protocols.
- Reducing downstream risk: Consistent tensile strength data helps teams qualify materials with greater confidence. It reduces unexpected materials failures, rework, and last-minute sourcing changes that can introduce supply chain risk later in the product lifecycle.
7 Steps for a Tensile Strength Test
Here are the necessary steps to perform an effective tensile strength test:
1. Prepare and Condition the Specimen
It is essential to ensure that the test sample matches the dimensions specified in the relevant testing standard, which might include matching the precise initial gauge length and cross-sectional area. This standardization ensures that results are comparable across different labs and testing conditions. For example, flaws from improper machining (e.g., rough surfaces) can act as stress concentrations, causing the material to fail.
You can do this by precisely measuring and recording the required dimensions using high-accuracy calipers or micrometers. If testing materials are sensitive to the environment, as many polymers are, you can condition them by storing them in a controlled environment before testing.
2. Set Up and Calibrate the Testing Machine
This step involves preparing the Universal Testing Machine (UTM) and confirming the accuracy of its force and displacement measurement systems. If the load cell or extensometer is not calibrated, all calculated stress and strain values will be inaccurate. Another error could be failing to select the correct load cell size, which can cause overloading.
After verifying that the UTM has a recent, traceable calibration certificate, you can ensure all data acquisition and control systems are configured for real-time monitoring. Another tip is to install a load cell where the expected breaking load falls between 20% and 80% of the load cell’s maximum capacity for optimal accuracy and resolution.
3. Install the Appropriate Grips and Fixtures
The components that physically hold and pull the material must stay secure throughout the test, as any slipping could cause premature failure in the grip section or lead to inaccurate elongation measures.
To avoid invalidating the test, make sure you select grips (e.g., wedge or hydraulic) suitable for the material. While doing so, verify that the jaw faces are clean and correctly aligned to maximize contact area.
4. Mount and Align the Specimen
Now, it’s time to place the material in the UTM and position the strain measurement device. If it’s off-center or tilted, the machine will introduce bending, and your numbers will be skewed.
Next, clip or clamp the extensometer across the gauge length so it reads strain directly on the material. As long as the material is secure and aligns with the axis, the test will apply tension as intended.
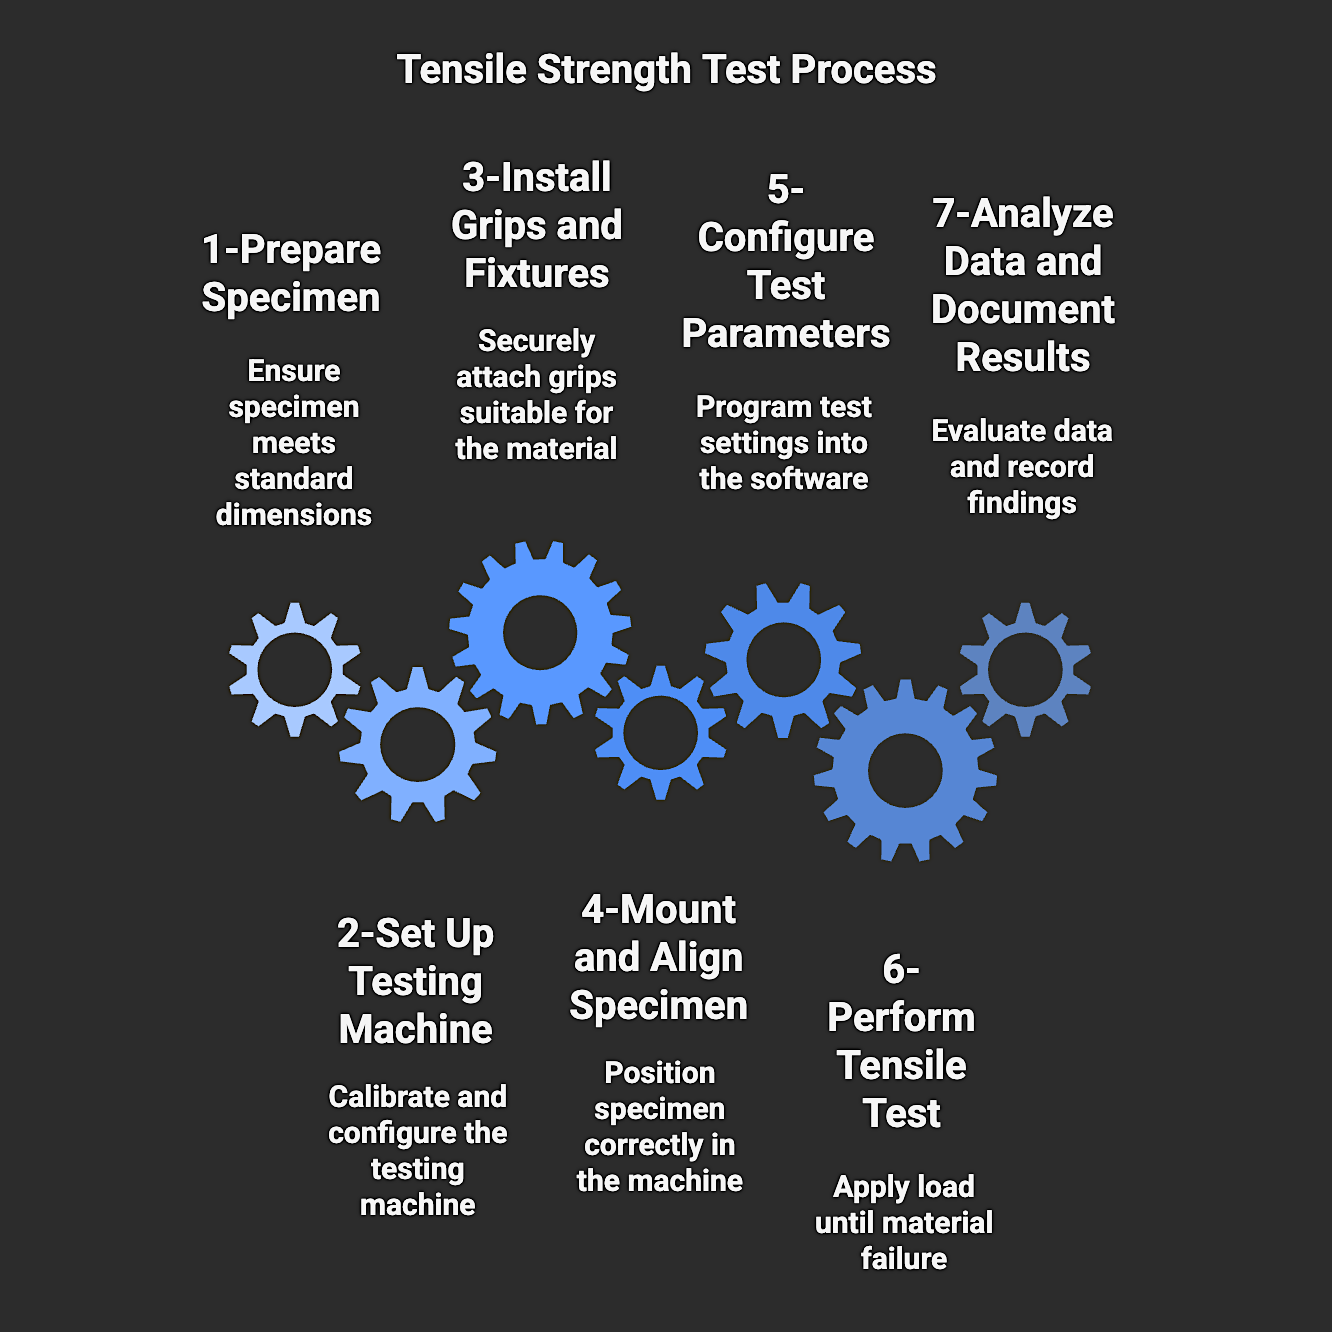
5. Configure Test Parameters
Next, you must program the tensile strength test. Input the dimensions of your material, select the test standard, and program the speed requirements into the UTM control software. Your job is to ensure the crosshead speed is consistent and that the machine’s sampling rate is fast enough to accurately plot the entire stress-strain curve without missing any key data points.
Set the required crosshead speed or strain rate according to the selected test standard. Then, input the material’s initial gauge length and cross-sectional area into the software.
To eliminate setup errors and ensure long-term data consistency, you can centralize all test parameters, standards, and historical configurations in a cloud-based materials informatics and discovery platform. Integrating the UTM software with a platform like MaterialsZone allows every test run to be immediately traceable and comparable.
6. Perform the Tensile Strength Test
This is the execution phase, where you can initiate the test and continuously apply load until the material fails. Depending on the material, the initial stress–strain response may be linear or nonlinear, but deformation in this early region is generally elastic, meaning the material will return to its original shape if the load is removed.
If you continue, you’ll reach the plastic range: the stretch is permanent, and on ductile materials, you’ll often see a neck form as the cross-section thins. Continue recording the data throughout the test until the material breaks or you’ve reached the maximum extension set for the test.
7. Analyze the Data and Document Results
Once the test is completed, the UTM software will convert the raw load/elongation data into the standardized stress-strain curve. Analyzing it correctly enables you to determine mechanical properties such as modulus, tensile strength, and elongation that govern design decisions and compliance checks.
You can measure and record the final fractured length and minimum cross-sectional area to calculate ductility metrics, such as percent elongation. Documenting all test conditions and observations, including fracture type and anomalies, is essential for compliance.

If you’re utilizing smart manufacturing solutions alongside a materials informatics platform like MaterialsZone, you can use its Visual Analyzer to compare results across batches and projects. The built-in Predictive Co-Pilot feature enhances the process by identifying the influence of processing variables and supporting data-driven decisions that accelerate R&D cycles.
Turn Tensile Test Results into Faster R&D Decisions
The tensile strength test is a definitive method for evaluating a material’s integrity and performance. Meticulously following the seven steps we’ve outlined in this blog helps you prepare materials and machines for accurate data logging.
However, the greatest challenge for R&D Directors and QA/QC Managers isn’t running the test. The real hurdle involves leveraging data across teams and projects. When you keep R&D data in siloed testing software and scattered drives, it is challenging to harness it to predict performance and drive future innovation.
Using MaterialsZone centralizes R&D and QA workflows. It unifies tensile test results and stress-strain data so they are easier to track, compare, and share across teams. The AI-powered materials informatics platform empowers lean R&D to enhance materials data utilization and bring better products to the market faster.
Request a MaterialsZone demo today to start turning valuable mechanical data into your greatest R&D advantage.

.png)
.png)
